

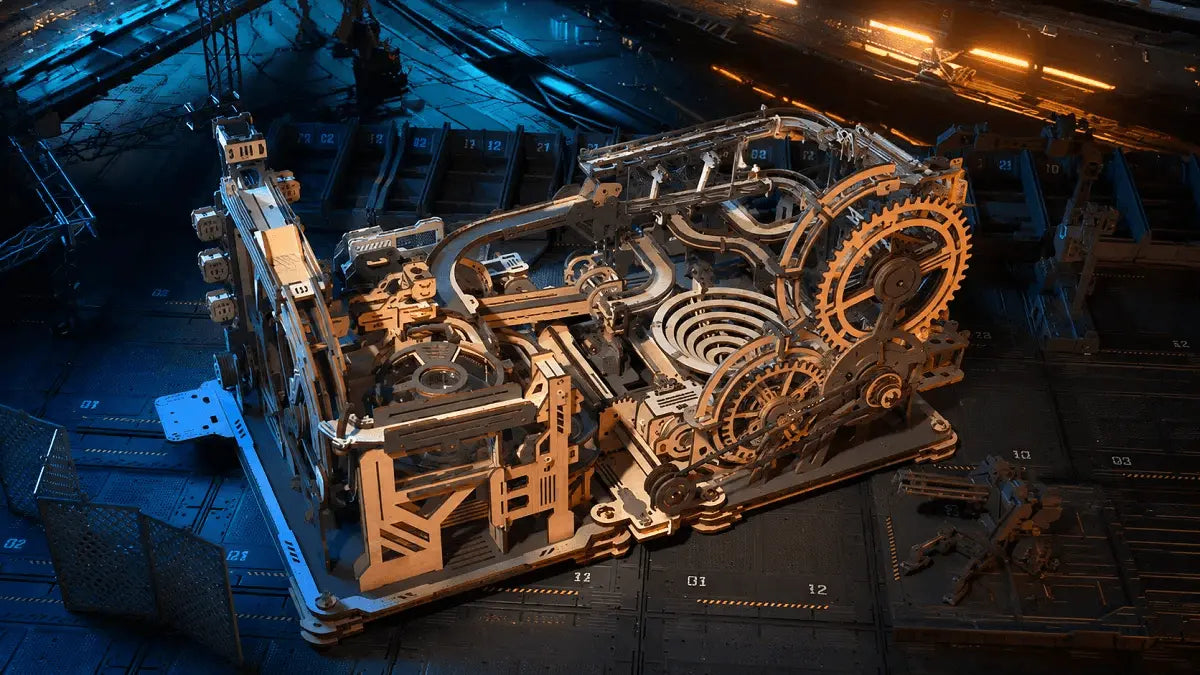
Advanced mechanical models are designed for builders who want more than a decorative puzzle. They combine precise wooden parts with working gears, tracks, levers, linkages or powered movement, turning the assembly process into a genuine hands-on engineering challenge.
The most difficult kit is not automatically the best choice. Your ideal next project should stretch your skills without demanding more time, workspace or patience than you can realistically give it. This guide explains what makes a mechanical model advanced, how to judge whether you are ready and which features to compare before choosing your next build.
Quick answer: Compare your previous building experience, available assembly time, preferred type of motion, finished model size and willingness to troubleshoot. Then choose a kit that is approximately one step above your last successful project.
In this article:
- What Are Advanced Mechanical Models?
- What Makes a Mechanical Model Advanced?
- Are You Ready for an Advanced Model?
- Types of Advanced Mechanical Models
- How to Choose the Right Mechanical Model Kit
- Four Advanced Mechanical Models to Consider
- Tips for Building an Advanced Mechanical Model
- Common Problems and How to Fix Them
- Pre-Purchase Checklist
- Frequently Asked Questions
- Choose a Challenge You Will Enjoy
What are advanced mechanical models?
Advanced mechanical models are multi-stage construction kits that create a working or interactive object. Instead of assembling only an exterior shape, the builder constructs the internal mechanism that makes the finished model move or respond.
Depending on the kit, that mechanism may guide marbles through several tracks, transfer power through a gear train, move typewriter keys, control a flywheel or operate a tabletop game. The final result may be powered by a hand crank, spring, gravity, battery or electric motor.
These projects are often described as mechanical model kits for adults, advanced 3D wooden puzzles or mechanical engineering kits. You do not need professional engineering knowledge to enjoy them, but patience, careful reading and an interest in how moving parts interact are valuable.
What makes a mechanical model advanced?
Piece count matters, but it does not tell the whole story. A model with fewer interacting components can be more demanding than a larger decorative puzzle. True difficulty comes from several factors working together.
Multiple dependent mechanisms
An advanced kit usually contains several subassemblies that must work as one system. A crank may rotate a gear train, which lifts a ball, activates a switch and sends the ball onto another track. If one stage is misaligned, the effect can continue through the rest of the mechanism.
Tighter fitting tolerances
Moving parts need enough contact to transfer force but enough clearance to move freely. Shafts must sit straight, gears must mesh correctly and sliding pieces cannot be pinched too tightly. Careful fitting becomes more important than speed.
Longer assembly sequences
Advanced wooden mechanical models often require several focused sessions. The challenge is not only the number of hours involved; it is also remembering how completed sections connect and protecting delicate assemblies between sessions.
Functional testing and adjustment
A static puzzle can look complete even when an internal connection is imperfect. A working model immediately reveals resistance, missed connections or incorrect alignment. Testing and making small adjustments are therefore part of the build rather than signs that the project has failed.
Electrical or powered features
Some advanced kits add motors, lights, sensors or battery compartments. These features increase the number of systems that must be assembled and checked, especially when wires need to pass through a wooden structure without being trapped.
Are you ready for an advanced mechanical model?
You do not need to be an expert, but you should be comfortable slowing down and correcting small mistakes. You are probably ready to move up if most of the following statements describe you:
- You have completed at least one medium-difficulty 3D puzzle or model kit.
- You can follow diagrams carefully without rushing through repeated-looking steps.
- You are willing to organize small parts before assembly.
- You can stop and investigate when a gear, axle or lever does not move freely.
- You have a workspace where an unfinished model can remain protected.
- You enjoy the construction process as much as the finished display.
If this would be your first 3D wooden puzzle, begin with an easy or medium model before choosing a complex working machine. Moving up one level at a time usually produces a more enjoyable result than selecting the largest kit available.
Types of advanced mechanical models
Different types of mechanical kits reward different interests. Think about the kind of movement you want to build and watch after the project is finished.
Mechanical marble runs

Marble runs combine gravity, momentum, track geometry and mechanical lifting systems. The building challenge comes from creating a reliable path: the balls must gain enough speed to continue moving without jumping off curves or becoming stuck.
This type suits builders who enjoy testing, visible movement and immediate feedback. A hand-cranked marble run is also easy to demonstrate because viewers can see the transfer of energy from the handle to the gears, lift and tracks.
Playable mechanical machines
Playable models continue providing value after assembly. Pinball machines and other tabletop games combine a demanding construction project with controls, targets, tracks and repeated play. They generally need more finished display space and may incorporate electrical features.
Functional historical machines
Typewriters, printing presses, gramophones and telegraphs recreate mechanisms that shaped communication and industry. These models appeal to builders who enjoy vintage design, mechanical history and synchronized movement.
Powered vehicles and engines
Vehicle and engine kits focus on drivetrains, axles, flywheels, pistons and direction control. A powered model adds another level of satisfaction because successful assembly produces controlled movement rather than a static display.
Clocks, music boxes and kinetic displays
These models emphasize repeated, regulated motion. Clockwork mechanisms reward precise alignment, while mechanical music boxes combine gears with timed musical movement. They are good choices for builders who want an elegant display with a clear function.
How to choose the right mechanical model kit
Use the following criteria before comparing designs. They will help you choose based on the actual building experience rather than the box image alone.
1. Match the difficulty to your experience
Review the hardest model you have completed successfully. Consider whether it contained moving gears, repeated assemblies or electrical parts. Your next kit should introduce one or two new challenges, not every possible complication at once.
Do not treat a difficulty symbol as a universal standard. Also check the piece count, estimated build time, number of moving systems and whether the model requires testing during assembly.
2. Choose a realistic assembly time
Estimated build times are useful for comparison, but individual results vary. A careful first-time builder may need longer than the estimate, while an experienced model maker may work faster. Choose a project you can divide into several comfortable sessions.
If you need to clear your table every evening, a long build can become frustrating. Prepare shallow trays or sealable containers so numbered pieces and unfinished sections remain organized.
3. Select the type of movement you enjoy
Ask what you want the completed model to do. Marble tracks emphasize gravity and routing. A pinball machine emphasizes control and gameplay. A typewriter coordinates keys and linkages. A powered engine highlights transmission and direction.
The best mechanism is the one you will still enjoy operating and showing after the final piece is installed.
4. Measure the finished display space
Advanced kits can occupy considerably more space than their packaging suggests. Check the assembled dimensions and measure the intended shelf, desk or table before buying. Leave extra room for cranks, levers, paper feeds, trailers or controls that extend beyond the main body.
5. Check the power and tool requirements
Confirm whether the kit is hand-operated, spring-driven or powered by batteries or a motor. Review what is included and whether you need batteries, a small screwdriver or a permitted lubricant. Always follow the instructions supplied with the exact model.
6. Consider maintenance and support
Working models may need occasional adjustment after repeated use. Keep the manual, unused spare parts and included tools together. It is also worth choosing a store that provides assembly guidance and replacement-part support if a delicate component is missing or damaged.
7. Choose for the builder, not only the occasion
When buying a mechanical model as a gift, match the recipient's experience, interests and available time. A technically impressive kit can be a poor gift if the recipient prefers shorter creative projects. Recommended age guidance should also be checked before purchase because advanced models may contain small parts and complex mechanisms.
Four advanced mechanical models to consider
These four projects represent different kinds of mechanical challenge. Prices and availability can change, so use the linked product pages for current specifications and purchasing information.
| Model | Best for | Main mechanical experience | Challenge profile |
|---|---|---|---|
| Marble Night City | A first advanced marble run | Hand-cranked gears, lifting and multilevel tracks | Precise track alignment and motion testing |
| DIY Pinball Machine | Builders who want a playable result | Launcher, flippers, ball paths and electronic features | Large, detailed, multi-system project |
| Mechanical Typewriter | Vintage design and synchronized movement | Keys, typebars, ribbon spool and paper feed | Repeated linkages requiring careful alignment |
| Steam Engine | Vehicle and drivetrain enthusiasts | Powered wheels, flywheel and direction control | Layered structure with powered movement |
1. ROKR Marble Night City: best for visible mechanical motion
The ROKR Marble Night City Marble Run turns a hand crank into a complete sequence of lifting and rolling movement. Its gears raise the steel balls before gravity carries them through multiple routes.
This is a strong choice if you have already completed a medium wooden puzzle and want to learn how alignment, friction and track angle affect performance. Because each test produces an immediate result, troubleshooting feels like part of the experience.
Choose it if: You enjoy kinetic displays, gears and repeated motion.
Think twice if: You dislike fine track adjustment or need a very compact finished model.
2. ROKR DIY Pinball Machine: best for a playable flagship project

The ROKR DIY Pinball Machine EG01 is built for hobbyists who want the finished project to become an interactive tabletop game. The construction combines mechanical ball movement with a launcher, responsive flippers, ramps, targets and electronic effects.
Its appeal is the combination of building and play. Completing the structure is only the first reward; afterward, you can operate the controls and test how the ball moves through the course.
Choose it if: You want a substantial project with an impressive playable result.
Think twice if: Your workspace or finished display area is limited.
3. ROKR Mechanical Typewriter: best for synchronized linkages

The ROKR Mechanical Typewriter Magic Version focuses on coordinated mechanical movement. Pressing the keys activates visible parts of the typing system, while the design recreates the form and character of a vintage machine.
This model rewards consistent alignment across repeated components. It is especially suitable for builders who enjoy mechanical history, detailed interiors and display pieces that invite interaction. Treat its typing function as an entertaining mechanical feature rather than a replacement for an everyday typewriter.
Choose it if: You enjoy vintage machines and carefully repeated assemblies.
Think twice if: You prefer fast construction or large, dramatic movement.
4. ROKR Steam Engine: best for powered vehicle mechanics

The ROKR Steam Engine Mechanical 3D Wooden Puzzle is suited to builders fascinated by drivetrains, wheels and industrial machinery. Its powered movement, flywheel details and direction control make the completed model feel closer to a small working vehicle than a static locomotive display.
The build requires attention to the relationship between the body, drivetrain and rolling components. It is a satisfying next challenge for anyone who has already enjoyed assembling mechanical vehicles or gear-driven models.
Choose it if: You want powered motion and a strong industrial design.
Think twice if: You prefer a purely hand-cranked model without electrical components.
Tips for building an advanced mechanical model
Prepare a dedicated workspace
Use a flat, well-lit surface with enough room for the instruction manual, wooden sheets and completed subassemblies. A light-colored mat makes small parts easier to see and prevents pieces from rolling away.
Read ahead before removing pieces
Study the next two or three steps before detaching components. Similar parts may have different orientations, and understanding their purpose can prevent an incorrect fit. Remove only the pieces required for the current stage unless the instructions say otherwise.
Organize parts by stage
Use shallow trays or small containers for fasteners, axles, gears and electrical parts. Keep unused sheets in numerical order. If you pause the project, cover or label every active group before leaving the workspace.
Support delicate pieces during removal
Press components out near their connection points instead of bending the entire sheet. Smooth only the areas recommended by the instructions, and avoid changing the shape of gear teeth or precision joints.
Check orientation twice
Many mechanical problems begin with a correctly shaped piece installed backwards. Compare holes, engraved markings and tabs with the diagram before pressing a tight joint together.
Test every moving subassembly
Rotate each gear group, axle or lever gently before surrounding it with additional parts. It is much easier to correct resistance while the mechanism is still accessible.
Never force a mechanism
If a part does not move, stop and identify the source of resistance. Check alignment, orientation, axle position and permitted lubrication. Forcing the control can damage several connected components instead of solving the original problem.
Take breaks before precision stages
Long sessions can make diagrams look deceptively familiar. Pause when you become tired or start repeating mistakes. Returning with fresh attention is faster than disassembling a large section later.
Common problems and how to fix them
| Problem | Possible cause | What to check |
|---|---|---|
| Gears feel tight | Misaligned shafts, excess friction or an over-tight joint | Confirm that the shafts are straight and use only the lubricant permitted by the instructions. |
| A mechanism stops midway | A reversed part or interference from a nearby component | Turn the mechanism slowly by hand and locate the exact point where resistance begins. |
| Marbles leave the track | Uneven supports, excessive speed or an incorrectly seated rail | Level the base and inspect the track immediately before the jump. |
| Powered parts do not move | Battery orientation, loose connection or mechanical resistance | Check the electrical setup according to the manual, then disconnect power before inspecting the mechanism. |
| A wooden joint will not fit | Incorrect orientation, material debris or the wrong similar-looking part | Compare the part number and diagram before making any adjustment. |
If a component appears defective or is missing, stop the build and request assistance rather than permanently modifying surrounding pieces. Save the model number, manual and packaging information until the project is working correctly.
Pre-purchase checklist for your next engineering challenge
- Difficulty: Is it one manageable step above your previous successful build?
- Assembly time: Can you divide the project across realistic sessions?
- Mechanism: Do you prefer marbles, gears, keys, engines, clocks or gameplay?
- Finished function: Do you want display, movement, sound or interactive play?
- Dimensions: Have you measured the completed model's intended location?
- Power: Are batteries or other power requirements suitable for you?
- Tools: Do you have every item not included with the kit?
- Age guidance: Is the model appropriate for the intended builder?
- Small parts: Can the workspace be kept away from young children and pets?
- Support: Is help available if a piece is missing or damaged?
Frequently asked questions
What is the best advanced mechanical model for a first challenging build?
A hand-cranked marble run is a strong transition from medium to advanced building because its movement is visible and easy to test in stages. However, the best choice still depends on your previous experience and the product's stated difficulty.
Are mechanical model kits only for engineers?
No. They are designed for hobbyists, puzzle enthusiasts, collectors and curious builders as well as people with technical backgrounds. Clear instructions and patience are usually more important than prior engineering education.
How long does an advanced mechanical model take to build?
Some can be completed during a long weekend, while larger multi-system kits may require many sessions. Treat the listed assembly time as an estimate and allow extra time for organization, testing and breaks.
Do advanced wooden mechanical models need glue?
Many use precision-cut press-fit construction, but requirements vary by model. Never assume that glue is required or permitted. Follow the instructions for the exact kit because adding adhesive to a moving joint can stop the mechanism.
What tools are useful for building a mechanical model?
A clean work mat, shallow parts trays, tweezers and good lighting are useful for most projects. Some kits may also call for a small screwdriver or a recommended lubricant. Check what the package includes before starting.
Why do wooden gears sometimes feel tight?
Tight movement can result from shaft misalignment, an over-pressed connection, surface friction or a reversed component. Inspect the mechanism carefully and follow the kit's adjustment guidance rather than forcing it.
Can an unfinished model be stored between sessions?
Yes. Keep it on a rigid board or in a covered container where delicate parts cannot be crushed. Store loose components in labeled containers and mark your current instruction step before stopping.
Are advanced mechanical models good gifts?
They can be excellent gifts for adults and older builders who enjoy puzzles, woodworking, engineering, vehicles or hands-on hobbies. Match the model to the recipient's experience and interests, and always check the recommended age and small-parts guidance.
Choose a challenge you will enjoy
The right advanced mechanical model should make you curious about the next step, not anxious about the total number of pieces. Start by choosing the motion that interests you, then confirm that the difficulty, assembly time, workspace and finished size fit your situation.
A marble run rewards experimentation, a pinball machine combines building with play, a typewriter highlights synchronized linkages and a powered steam engine brings a drivetrain to life. Each offers a different route into mechanical model building.
Ready to find your next build? Explore the Toys Quiz mechanical puzzle collection and compare the movement, difficulty and finished function that best match your experience.


Toys Quiz Team
The Toys Quiz Team creates practical guides for 3D puzzles, mechanical models and hands-on creative projects. We help hobbyists choose rewarding builds, understand how they work and enjoy every stage from the first piece to the finished display.
Toys Quiz is a creative lifestyle company dedicated to designing and developing 3D puzzles, toys, and wooden handicrafts. Subscribe to learn more.
Toys Quiz Team
The Toys Quiz Team creates practical guides for 3D puzzles, mechanical models and hands-on creative projects. We help hobbyists choose rewarding builds, understand how they work and enjoy every stage from the first piece to the finished display.
Toys Quiz is a creative lifestyle company dedicated to designing and developing 3D puzzles, toys, and wooden handicrafts. Subscribe to learn more.



Leave a comment
This site is protected by hCaptcha and the hCaptcha Privacy Policy and Terms of Service apply.